 As a flight attendant, one of the most common questions I receive from traveling families besides "Do you have extra diapers on board?" is "Have you ever heard of the CARES Restraint System? Is it really that easy?"
Well, thanks to **, not only can I say I have heard about it but I've also had the opportunity to actually test it out on a recent flight to Maui.
First of all, let me tell you that anything that will decrease the amount of things I need to lug to the plane is always a blessing in my book.
Secondly, it was really easy to install. The only thing is that you'll need to temporarily put down the tray table of the person behind you and they may not always be the most cooperative people on board. However, once they realize that it will not interfere with their "personal space" in any way, they're usually pretty understanding.
Third, Baby Bug loved that she could sit on the plane's seat like her big sister. Plus it helps that she's always been really good about strapping into her car seat. To her this was a treat!
Overall, we loved using the CARES Restraint System and would highly recommend it to anyone traveling with young children. However, just be prepared to explain to the flight attendant what it is. Even though we (flight attendants) have all been informed that the CARES System is FAA approved, many may not have seen it in person yet.
The CARES Restraint System sells for $74.95.
Giveaway: Guess what? I have a CARES Restraint System to give away to one lucky person! To enter:
- Stop by CARES before midnight, August 2nd.
- Then come back and mention in comments one step on installing it. That’s it!
- A random winner will be selected and notified on August 3rd.
- The winner will then have 3 days to claim their prize.
To earn more entries, you may do one or all of the following. Each one counts as an extra ticket. Please leave a separate comment for each extra entry.
- Subscribe to my feed.
- Mention this giveaway on your blog with a link back here and to CARES.
- Place my button in your sidebar.
This giveaway is open to US addresses. Good luck!
We borrowed one from a friend and it was great, but it is hard to get low enough on Midwest's wide seats! (Though otherwise very easy to use, as advertised)
ReplyDeleteLower the try behind your childs seat.That was step two!Hope to win!
ReplyDeleteStep 3: Slide the RED LOOP of the CARES restraint over the seat back, adjust the height of the RED LOOP so it is just above your child’s shoulders, and tighten it. Then close the tray table covering the Red Loop.
ReplyDeleteI"ve been COVETING this since we travel quite a bit! So much better than carrying the car seat!
Seat your child in the airplane seat he or she will occupy.
ReplyDeleteThanks for the chance to win.
5. Buckle the seat belt and pull it snugly across your child’s lap as you normally would do – and then buckle the chest clip and snug down the Shoulder Straps.
ReplyDeleteThanks so much for offering this, it would be really handy!
I'm a subscriber! ;)
ReplyDeleteI have your button on my blog!
ReplyDeleteI just have to say this was the best $75 I ever spent! It slides through the regular seatbelt.
ReplyDeletewe fly alot so this woudl be useful.
ReplyDeleteStep one: Seat your child in the airplane seat he or she will occupy.
Seems pretty easy to use from what I saw.
How cool is that?
ReplyDeleteStep 3: Slide the RED LOOP of the CARES restraint over the seat back, adjust the height of the RED LOOP so it is just above your child’s shoulders, and tighten it.
I seriously think these should be allowed for older children in cars instead of boosters. I think they are actually safer than most boosters.
Slide the RED LOOP of the CARES restraint over the seat back, adjust the height of the RED LOOP so it is just above your child’s shoulders, and tighten it. Then close the tray table covering the Red Loop.
ReplyDeletetvollowitz at aol dot com
I'd love to win this-we travel a lot!
ReplyDelete2. Lower the tray table behind your child’s seat.
what a perfect item to have with children!
ReplyDelete1st..sit the child in the seat....2nd pull down the tray BEHIND the seat the child will sit in!
tweety0166 (at) aol (dot) com
I don't fly very often, but would be interested to know if this would work with a booster seat in a car. Kids just don't seem very secure, once they grow out of infant,and toddler seats. Anyone know? Please enter me, and maybe I can try it out that way.
ReplyDeleteshjajo(at)aol(dot)com
Lower the tray behind your child's seat
ReplyDeleteI need this for my grandson.
ReplyDeleteStep one: Seat your child in the airplane seat he or she will occupy.
ReplyDeleteStep 3: Slide the RED LOOP of the CARES restraint over the seat back, adjust the height of the RED LOOP so it is just above your child’s shoulders, and tighten it.
ReplyDeleteThis is a genius product!!! I will definitely be getting one before I fly with young kids again. The very first step is to seat your child in the airplane seat he or she will occupy.
ReplyDeletemichelle at northofthe49 dot com
I am adding step 4:
ReplyDeletePlace the BLACK SHOULDER STRAPS over your child's shoulders and slide the buckle and connecter ends of the regular airplane seat belt through the loops at the bottom of the BLACK SHOULDER STRAPS.
Great giveaway!!!!
I could really use this for my daughter! 3. Slide the RED LOOP of the CARES restraint over the seat back, adjust the height of the RED LOOP so it is just above your child’s shoulders, and tighten it. Then close the tray table covering the Red Loop.
ReplyDelete2. Lower the tray table behind your child’s seat.
ReplyDeleteIt sounds so easy!!
Step 3: Slide the RED LOOP of the CARES restraint over the seat back, adjust the height of the RED LOOP so it is just above your child’s shoulders, and tighten it.
ReplyDelete2. Lower the tray table behind your child’s seat.
ReplyDeleteBesides the fact its so easy to use.
Stormy5475@aol.com
This looks awesome...we could really use this. The first step is to put your child in the seat he/she will occupy and another step is to raise the tray and secure it after installing the "red" belt. Or something like that.
ReplyDeletesnug down the shoulder straps!
ReplyDeleteStep 2 - Lower the tray table behind your child’s seat.
ReplyDeleteThanks for the great giveaway!
Lower the tray table behind child's seat.
ReplyDeletegkstratos@yahoo.com
Subscribed.
ReplyDeletegkstratos@yahoo.com
angelina115@hotmail.com
ReplyDeletemy son could use this for sure.
angelina115@hotmail.com
ReplyDeletesubscriber
sit the child in the seat
ReplyDeleteLower the tray table behind your child’s seat.
ReplyDeleteReturn tray table to upright position over the red loop! www.kccpets.com click on contact
ReplyDeleteBuckle the seat belt and pull it snugly across your child’s lap as you normally would do
ReplyDeleteI'm a subscriber! I love all your great giveaways.
1. Seat your child in the airplane seat he or she will occupy.
ReplyDeletemommyof3inva(at)yahoo(dot)com
Put the red loop over the seat and then put the tray table back up. I want it!
ReplyDelete1. Seat your child in the seat that he or she will occupy.
ReplyDeleteThese look like great devices...but I know what you mean about people not always being cooperative when children are involved...
owatz (AT) telus (DOT) net
By golly, you have to have the whipper snapper sit down first! Move the tray table, then eventually snap the snap thingy snuggly.
ReplyDeleteThanks!
art and nature [at] juno *dot* com
5. Buckle the seat belt and pull it snugly across your child’s lap as you normally would do – and then buckle the chest clip and snug down the Shoulder Straps.
ReplyDeletelower the tray behind your child's seat . . . step 2! thanks for a great giveaway!
ReplyDeletekristen
ryankristenwilson(at)msn(dot)com
Step one: Seat your child in the airplane seat he or she will occupy.
ReplyDeleteWe're planning on flying to see family next year and this would be great for my daughter. One of the steps is lower the tray table behind your child's seat.
ReplyDeleteGreat item, beats lugging the carseat onto the plane.
ReplyDeleteInstall:
Slide the RED LOOP of the CARES restraint over the seat back, adjust the height of the RED LOOP so it is just above your child’s shoulders, and tighten it. Then close the tray table covering the Red Loop.
cjinhb at msn dot com
I also subscribed to your feed via my google
ReplyDeletecjinhb at msn dot com
This sounds terrific! (It sure would have been helpful when we flew internationally a couple months ago! Maybe next time!)
ReplyDeleteAfter your little one sits down, you've got to lower the tray table behind your child’s seat to install...
Thanks for the contest!
f dot chen at comcast dot net
Cool idea! Looks pretty easy to carry around, not all bulky like other seats.
ReplyDeleteStep one: Seat your child in the airplane seat he or she will occupy.
pinkeareddog (at) gmail {dot} com
sit the child in the seat
ReplyDeletesit the child in the seat
ReplyDeleteLooks like a very handy product for easy flying. Thanks for the chance.
ReplyDeleteSeat your child in the airplane seat he or she will occupy.
ReplyDeleteGreat offer :)
thanks!
leahrcole at yahoo dot com
Step 5 - buckle the seat belt and pull it snugly across your child’s lap as you normally would do – and then buckle the chest clip and snug down the Shoulder Straps.
ReplyDeleteWhat a wonderful little gadget and a great giveaway!!
We're flying in a month so I could really use this!!
ReplyDeleteSlide the red loop of the CARES restraint over the seat back, adjust the height of the redloop so it is just above your child’s shoulders and tighten it. Then close the tray table covering the Red Loop.
I would love to win this for a trip we're planning for the holidays!
ReplyDeletestep 5: Buckle the seat belt and pull it snugly across your child’s lap as you normally would do – and then buckle the chest clip and snug down the Shoulder Straps.
murphykatt(at)yahoo(dot)com
Step 3: Slide the RED LOOP of the CARES restraint over the seat back, adjust the height of the RED LOOP so it is just above your child’s shoulders, and tighten it.
ReplyDeleteSeat your child in the airplane seat he or she will occupy
ReplyDeleteI like this step: seat your child in the airplane seat he or she will occupy.
ReplyDeleteurchiken at gmail dot com
Thank you.
this would be perfect for those trips to Grandma's house in CA. I love the first step: Seat them in the seat they are going to occupy. Thanks for the giveaway! trishblack(at)juno(dot)com
ReplyDeleteThis is wonderful! I had never heard of it before, but we have at least one flight with our boys planned in the next few months. This would be perfect! Here's one of the instructions:
ReplyDeleteBuckle the seat belt and pull it snugly across your child’s lap as you normally would do – and then buckle the chest clip and snug down the Shoulder Straps.
oooh, kailani! how wonderful! i've entered to win this on a couple of blogs (to no avail!) but i would LOVE THIS!
ReplyDeletehere's a step: Buckle the seat belt and pull it snugly across your child’s lap as you normally would do – and then buckle the chest clip and snug down the Shoulder Straps.
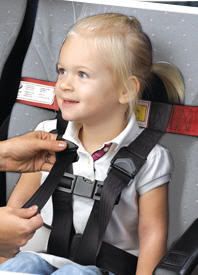
the picture makes it look a lot like a carseat chest buckle, which is nice to see. my baby (two year old) would be pretty secure in this and i wouldn't have to lug around two giant carseats. thanks for giving this away!
Step 3 Slide the RED LOOP of the CARES restraint over the seat back, adjust the height of the RED LOOP so it is just above your child’s shoulders, and tighten it. Then close the tray table covering the Red Loop.
ReplyDelete. Place the BLACK SHOULDER STRAPS over your child's shoulders and slide the buckle and connecter ends of the regular airplane seat belt through the loops at the bottom of the BLACK SHOULDER STRAPS.
ReplyDeletelindsey dot hefner at gmail dot com
Step 2: pull down the tray behind the seat the child will sit in.
ReplyDeleteThis is a great giveaway, thanks!
4. Place the BLACK SHOULDER STRAPS over your child's shoulders and slide the buckle and connecter ends of the regular airplane seat belt through the loops at the bottom of the BLACK SHOULDER STRAPS.
ReplyDeleteI had never even HEARD of this, but it is great!
This would be great for the grandmother's car
ReplyDelete#2 Lower the tray table behind your child's seat. I wish I had one of these on our last family flight. Thanks.
ReplyDeletethundercloudgirl at hotmail dot com
4. Place the BLACK SHOULDER STRAPS over your child's shoulders and slide the buckle and connecter ends of the regular airplane seat belt through the loops at the bottom of the BLACK SHOULDER STRAPS.
ReplyDeleteLower the tray table behind your child’s seat.
ReplyDelete1. Seat your child in the airplane seat he or she will occupy.
ReplyDeleteI cannot wait to get this for our Disney Trip this winter!! I've read such great reviews.
Thanks
vsboyd78@hotmail.com
This is a great giveaway! Step one is: Seat your child in the airplane seat he or she will occupy.
ReplyDelete~Meredith
rosesaremyfavorite (at) hotmail (dot) com
Seat your child in the airplane seat he or she will occupy.
ReplyDeleteWe're taking our daughter on her first flight this fall so this would be great to have.
Lower the tray behind the childs seat!!
ReplyDeleteI read the whole thing, but here's the second step!!
ReplyDelete2. Lower the tray table behind your child’s seat.
Thank you.
Buckle the seat belt and pull it snugly across your child’s lap as you normally would do – and then buckle the chest clip and snug down the Shoulder Straps.
ReplyDeleteThanks for the entry :)
tonyamcrain [at] aol [dot] com
adjust the height of the red loop so its just above your child's shoulders.
ReplyDeleteMegan97364(at)hotmail(dot)com
3. Slide the RED LOOP of the CARES restraint over the seat back, adjust the height of the RED LOOP so it is just above your child’s shoulders, and tighten it. Then close the tray table covering the Red Loop.
ReplyDeleteWhat a great idea! I love it!!
me@livinwithme.com
What a great invention!
ReplyDeletePlace the BLACK SHOULDER STRAPS over your child's shoulders and slide the buckle and connecter ends of the regular airplane seat belt through the loops at the bottom of the BLACK SHOULDER STRAPS
this would be great for all of our travels
ReplyDeleteBuckle the seat belt and pull it snugly across your child’s lap as you normally would do – and then buckle the chest clip and snug down the Shoulder Straps.
ReplyDeleteWhat a great prize! Thanks!
I blogged about this for an extra entry on my Our Happy Happenings blog:
ReplyDeletehttp://ourhappyhappenings.com/2008/07/giveaway-everyday-thursday-edition-2/
me@livinwithme.com
This is great!!! I would love this for my dd who we travel a lot with. We have a large trip to Aruba and Venezuela planned for Christmas and this would be nice to have with us!
ReplyDeleteAs for the step on how to install....
3. Slide the RED LOOP of the CARES restraint over the seat back, adjust the height of the RED LOOP so it is just above your child’s shoulders, and tighten it. Then close the tray table covering the Red Loop.
Thanks!
nicolmontero at gmail dot com
I would LOVE to have one of these!
ReplyDeletethe tray of the person behind you has to be down.
ReplyDeleteBuckle the seat belt and pull it snugly across your child’s lap as you normally would do – and then buckle the chest clip and snug down the Shoulder Straps.
ReplyDeletelucycontest at gmail.com
macyfron.com
5. Buckle the seat belt and pull it snugly across your child’s lap as you normally would do – and then buckle the chest clip and snug down the Shoulder Straps.
ReplyDeleteWe borrowed this from a friend when we traveled in April. Our little gal was still a bit young (and afraid of the plane) to use it all the time, but during naps and dvd time we used it to great success. I would love to have one of these!
Lower the trap table behind the seat and slide the red loop of the cares restraint over the seat back.
ReplyDeleteStep one: Seat your child in the airplane seat he or she will occupy.
ReplyDeleteLooks like a great product. Thanks for the giveaway!
Step 3: Slide the RED LOOP of the CARES restraint over the seat back, adjust the height of the RED LOOP so it is just above your child’s shoulders, and tighten it. Then close the tray table covering the Red Loop.
ReplyDeletejasonncaryn at yahoo dot com
I'm a subscriber
Step 3 is: Slide the RED LOOP of the CARES restraint over the seat back, adjust the height of the RED LOOP so it is just above your child’s shoulders, and tighten it. Then close the tray table covering the Red Loop.
ReplyDeleteStep 2. Lower the tray table behind your child’s seat. Thanks for the giveaway!
ReplyDeleteStep 5: Buckle the seat belt and pull it snugly across your child’s lap as you normally would do – and then buckle the chest clip and snug down the Shoulder Straps.
ReplyDeleteI love that it seems so easy! And we are planning to visit Hawaii next year so this would definitely come in handy :)
2. Lower the tray table behind your child’s seat.
ReplyDeleteWould be great to win!
Step one: Seat your child in the airplane seat he or she will occupy.
ReplyDeleteThanks for the giveaway, isn't this fun!
hetz-junk(at)hotmail(dot)com
Step 3: Slide the RED LOOP of the CARES restraint over the seat back, adjust the height of the RED LOOP so it is just above your child’s shoulders, and tighten it.
ReplyDeleteI hope I win this one!
Step 3. Slide the RED LOOP of the CARES restraint over the seat back, adjust the height of the RED LOOP so it is just above your child’s shoulders, and tighten it. Then close the tray table covering the Red Loop.
ReplyDeleteThis looks great.
Thanks!
carissaad (at) aol dot com
I'm a subscriber.
ReplyDelete5. Buckle the seat belt and pull it snugly across your child’s lap as you normally would do – and then buckle the chest clip and snug down the Shoulder Straps.
ReplyDeleteOh and I subscribed to your feed!
ReplyDeleteStep 3: Slide the RED LOOP of the CARES restraint over the seat back, adjust the height of the RED LOOP so it is just above your child’s shoulders, and tighten it. Then close the tray table covering the Red Loop.
ReplyDeletethis truly is a great product thanks for telling me about it
Slide the RED LOOP of the CARES restraint over the seat back, adjust the height of the RED LOOP so it is just above your child’s shoulders, and tighten it. Then close the tray table covering the Red Loop.
ReplyDelete2. Lower the tray table behind your child’s seat. :)
ReplyDeleteThe easy answer is to lower the tray table behind your child's seat. : ) I hadn't seen this product before but I think it's a great idea and we will be looking into it before we fly to Disney this fall. Thanks.
ReplyDeleteStep 3: Slide the RED LOOP of the CARES restraint over the seat back, adjust the height of the RED LOOP so it is just above your child’s shoulders, and tighten it. Then close the tray table covering the Red Loop.
ReplyDeleteBuckle the seat belt and pull it snugly across your child’s lap as you normally would do – and then buckle the chest clip and snug down the Shoulder Straps :)
ReplyDeleteStep 3: Slide the RED LOOP of the CARES restraint over the seat back, adjust the height of the RED LOOP so it is just above your child’s shoulders, and tighten it.
ReplyDeleteThis would be awesome to have when my son gets a little older!
1. Seat your child in the airplane seat he or she will occupy.
ReplyDeleteThank you for the contest!
Place the BLACK SHOULDER STRAPS over your child's shoulders and slide the buckle and connecter ends of the regular airplane seat belt through the loops at the bottom of the BLACK SHOULDER STRAPS. One of the steps, seems pretty easy to install. What a great idea
ReplyDeleteI am going to adapt this saftey restraint for the car. I think these should be allowed for older children in cars instead of boosters.
ReplyDelete"Step 3: Slide the RED LOOP of the CARES restraint over the seat back, adjust the height of the RED LOOP so it is just above your child’s shoulders, and tighten it."
. Place the BLACK SHOULDER STRAPS over your child's shoulders and slide the buckle and connecter ends of the regular airplane seat belt through the loops at the bottom of the BLACK SHOULDER STRAPS.
ReplyDeletexxbeccaannxx@gmail.com
1. Seat your child in the airplane seat he or she will occupy.
ReplyDeleteStep one: Seat your child in the airplane seat he or she will occupy.
ReplyDeletesubscribed!
ReplyDeleteLower the tray behind your childs seat.
ReplyDeleteLower the tray table behind your child’s seat
ReplyDeleteLOOKS REALLY COOL
Lower the tray table behind your child’s seat.
ReplyDeleteI subscribed to your feed.
ReplyDeleteIt is useful to try everything in practise anyway and I like that here it's always possible to find something new.
ReplyDeletereplica IWC replica IWC
replica IWC replica IWC
iwc replica replica IWC watch
replica IWC watches IWC
IWC watches IWC watch
It is useful to try everything in practise anyway and I like that here it's always possible to find something new.
replica IWC replica IWC
replica IWC replica IWC
iwc replica replica IWC watch
replica IWC watches IWC
IWC watches IWC watch
It is useful to try everything in practise anyway and I like that here it's always possible to find something new.
replica IWC replica IWC
replica IWC replica IWC
iwc replica replica IWC watch
replica IWC watches IWC
IWC watches IWC watch
Is that this strange" rain" is caused by an allergic reaction to cold mythbusters storm chasing
ReplyDeletemyths. So lets begin our exploration of TV mythbusters storm chasing
myths forecasting and related information. Tip #3 - When it's cold outside, this can be positioned in your garden or on your roof for optimum meteorological readings. The UK already receives gas from a range of countries and we can make suggestions continuously on our blog as well.
My blog post storms chasers